


Privacy Policy
By using EcoFlow Products, Applications and Services, you consent to the EcoFlow Term of Use and Privacy Policy, which you can access via the "About" section of the "User" page on the EcoFlow App or on EcoFlow Official website at https://ecoflow.com/pages/terms-of-use and https://ecoflow.com/pages/privacy-policy .
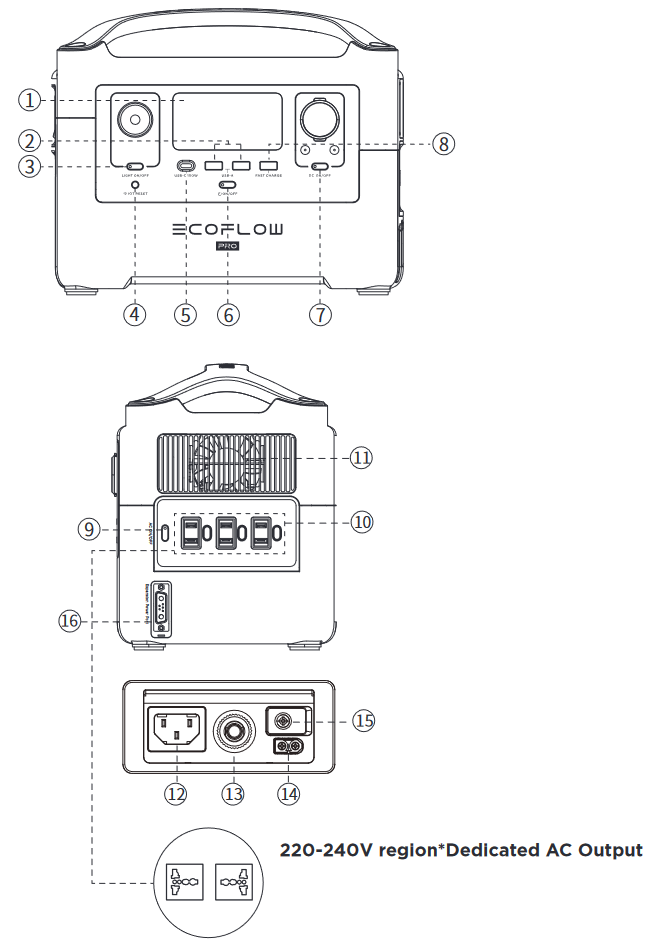
220-240V region*Dedicated AC Output
*EcoFlow has designed different AC output sockets following the local regulations of different countries.


Port Usage Indicators
| j | Extra Battery Indicator  | The Extra Battery icon will appear when Extra Battery is connected to the main model. |
| k | AC Indicator  | The AC indicator icon will appear when the AC power button is turned on. |
| l | USB-A Indicator  | The USB-A output icon will appear on the LCD display when a USB-A port is in use. |
| m | USB-C Indicator  | The USB-C output icon will appear on the LCD display when a USB-C port is in use. |
| n | Car Power Output Indicator  | The Car Power Output icon will appear on the LCD display when a Car Output port is in use. |
| o | IOT Indicator  | The icon will appear when the unit is connected to the App. |
| p | UPS Indicator  | When the SOC (State of Charge) is set in the EcoFlow App, the UPS icon will appear on the screen. |
Protection Information Instruction
The RIVER Pro display screen uses different icons and combined icons to indicate the reason for protection.
 OVERLOAD | USB-A Overload Protection | USB-A and OVERLOAD icons flash together. Disconnect all electrical appliances and wait 10 seconds before adding each appliance back. |
  | USB-C High Temperature Protection | USB-C and High-Temperature icons flash together. Disconnect electrical appliance and let RIVER Pro cool down before adding appliance back. |
 OVERLOAD | USB-C Overload Protection | USB-C icon and the OVERLOAD icon flash together. Disconnect electrical appliance and wait 10 seconds before adding appliance back. |
RECHARGING TIME   | High Temperature Recharge-protection | RECHARGING TIME, Exclamation and High-Temperture icons flash together. This will happen especially when you recharge the RIVER Pro immediately after a heavy battery use. Disconnect Charging Cables and all electrical appliances and wait until RIVER Pro has cooled down before plugging Charging Cable back in and recharging. |
  | High Temperature Discharge-protection | Exclamation and High-temperature icons flash together. Turn OFF System Power and let RIVER Pro cool down before turning the System Power back on. |
RECHARGING TIME  | Low Temperature Recharging-protection | Recharging Time, Exclamation and Low-Temperature icons flash together. Disconnect Charging Cables and all electrical appliances and place RIVER Pro in warmer place before plugging Charging Cable back in and recharging. |
  | Low Temperature Discharge-protection | Exclamation and Low-Temperature icons flash together. Turn OFF System Power and place RIVER Pro in warmer place before turning the System Power back on |
RECHARGING TIME  OVERLOAD | Overload Recharging-protection | RECHARGING TIME, Exclamation and OVERLOAD icons flash together. Unplug Charging Cables, restart RIVER Pro and plug back in. |
 OVERLOAD OVERLOAD | Overload Discharging-protection | Exclamation and Overload icons flash together. Disconnect all electrical appliances, restart RIVER Pro, and add each appliance back in in turn. Please note that electrical appliances must be operated within rated power. |
 | Communication Failure between Main Board and BMS | Only the Exclamation icon is flashing. Restart RIVER Pro. |
 | Light stays on | The Exclamation icon is on. Restart RIVER Pro. |
 | Communication Failure between Main Board and AC | AC icon Flashes. Restart RIVER Pro. |
 OVERLOAD | Inverter Output Overload | AC and Overload icons flash together. Turn off RIVER Pro. Unplug all appliances. Wait 10 seconds, turn System Power ON then AC Power ON and plug each appliance back in in turn. If the icons keep flashing, do not charge or discharge the unit. Please note that electrical appliances must be operated within rated power. |
  | Inverter High Temperature Protection | AC and High-temperature icons flash together. Turn off RIVER Pro and let it cool down. Then turn System Power On and AC Power On. |
  | Inverter Low Temperture Protection | The AC and Low-Temperature icons flash together. Turn off RIVER Pro, move RIVER Pro to a warmer place and wait for the inverter to warm up. Then turn System Power On and AC Power On. |
 | Fan Blockage | Fan icon flashes. Turn Off RIVER Pro and carefully clean and vacuum around vents at both sides of the RIVER Pro. Turn System Power On. |
 OVERLOAD | Car Charger Overload | Car and OVERLOAD icons flash together. Restart RIVER Pro, and make sure that electrical appliances must be operated within rated power. |
  | Car Charger High Temparature Protection | Car and High-Temperature icons flash together. Turn RIVER Pro off and let it cool down. Turn System Power On then DC Power On. |
*If the product is not operating properly or the icon keep flashing, please contact the customer support team. Do not charge the unit.
How to recharge the RIVER Pro using solar panels?
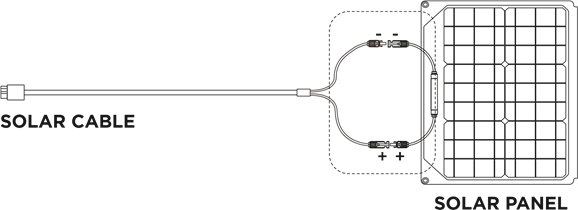
If you need to know more about the connection of solar panel, please refer to the Solar Panel User Guide. Here we focus on demonstrate how to connect RIVER Pro to 1 set of solar panel or connect RIVER Pro to 2 sets of solar panels in parallel. The RIVER Pro can support a 10-25V DC input. When the input exceeds 25V, the RIVER Pro's overvoltage protection will be triggered. Overvoltage may damage the product. Users should follow these instructions. EcoFlow DO NOT provide free repair services for any product damage caused by connecting too many solar panels to the product or incorrect connection, even during the warranty period.



Entry-Level UPS User Guide
Users can connect the AC Charging Cable of RIVER Pro to an AC power source and connect a device to RIVER Pro and turn on the AC Power Button to automatically enter the entry-level UPS mode. When the AC power source is cut off, power will be supplied from the battery of RIVER Pro to your device (as shown below).
* UPS is only applicable to electrical appliances below 600W. To avoid an Overload condition, do not attempt to power any equipment drawing more than 600W of power. EcoFlow will not be responsible for any loss of data or equipment damages caused by careless use or customers' failure to follow the instructions. Only one RIVER Pro can conduct the UPS function; the UPS function is not available when more than one RIVER Pro is connected together. Please follow the connection instructions below:
With the built-in 600W inverter, you can use the X-Boost feature to power 600W-1200W appliances without the disruption caused by overload protection. Traditional inverters will overload when one electrical appliance with a higher rated power is connected. Meanwhile, RIVER Pro's built-in inverter, which has the X-Boost feature, enables the powering of 600W-1200W electrical appliances. Please take note of the following when using this mode:
* You may use electrical appliance with heating elements and a rated power between 600W-1200W, such as hair dryers and electric kettles. But the X-Boost mode is not suitable for all electrical appliances.
Some appliances with a rated power of 600W-1200W that have strict voltage requirements are still not compatible. Please conduct a full test to confirm before usage.
It is not recommended to use the RIVER Pro to charge heavy-duty devices, such as air conditioners, coffee machines, clothes dryer, electric camp stoves, full size refrigerators, microwaves, mowers, ovens, washing machines etc.
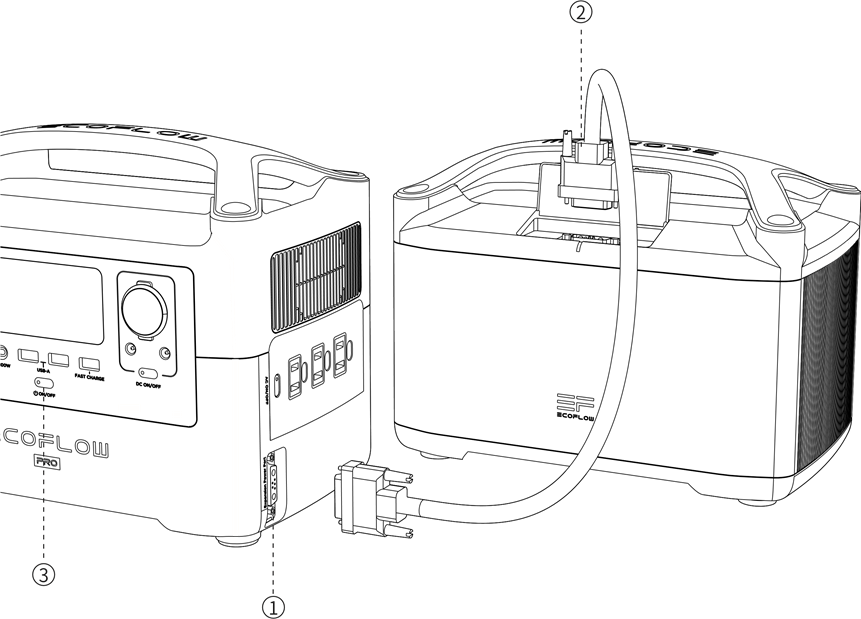
Get the RIVER Pro, RIVER Pro Extra Battery and Expansion Power Cable ready. Power off both the RIVER Pro and RIVER Pro Extra Battery before attempting to connect them together. If the products are not turned off, they cannot be successfully connected. Then follow the steps below.

Expansion Power Cable
* Not included in the package, this cable only comes with RIVER Pro Extra Battery
| General Specs | |
| Net Weight | * 16.8 lbs (7.6kg) |
| Dimensions | * 11.4 x 7.1 x 9.3 in (28.9 x 18.0 x 23.5 cm) |
| Capacity | 720Wh (28.8V) |
| Testing and certification | UL Standard, CE, FCC, RoHS, RCM |
| Outputs | |
| AC Output (x3) / (x2 International Version) Full Sine Wave | 600W (Surge 1200W) total, 120Vac (50Hz/60Hz) / 230Vac (50Hz/60Hz) |
| USB-A Output (x2) | 5Vdc, 2.4A, 12W Max, per port |
| USB-A Fast Charge (x1) | 5Vdc, 9Vdc, 12Vdc, 2.4A, 28W Max |
| USB-C Output (x1) | 5Vdc, 9Vdc, 12Vdc, 15Vdc 20Vdc, 5A, 100W Max |
| Car Power Output (x1) | 136W, 13.6Vdc, 10A Max |
| DC5521 Output (x2) | 13.6Vdc, 3A Max (per port) |
| Input | |
| AC Charge Input Voltage | 100-120Vac (50Hz/60Hz) International Version 220-240Vac (50Hz/60Hz) |
| AC Charge Input Power (Example 1) | X-Stream Charge 660W Max |
| Solar Charge Input | 200W 10-25Vdc 12A Max |
| Car Charger (Example 2) | 12Vdc 8A Max |
| Battery | |
| Cell Chemistry | Lithium-ion |
| Discharge Temperature | -4°F to 140°F (±5°F), -20°C to 60°C (±3°C) |
| Charge Temperature | 32°F to 113°F (±5°F), 0 to 45°C (±3°C) |
| Shelf Life | 1 Year (after fully charged) |
| Cycle Life | 800 cycles to 80%+ capacity |
* Please Note: The above weight, size, etc. have certain measurement errors. Please refer to the actual measurement.

Example 1:
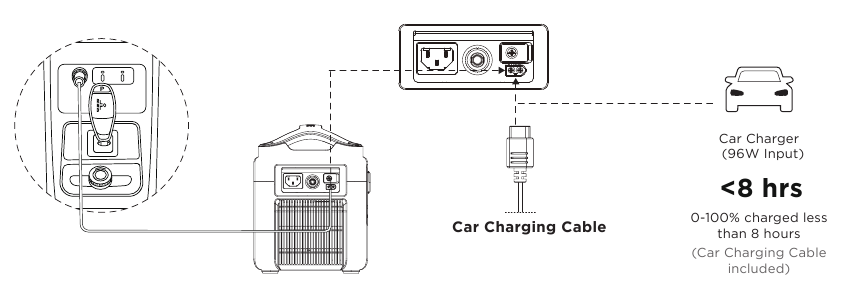
Example 2:
How do I recharge my RIVER Pro?
RIVER Pro has an AC charging port and an XT60 charging port located on the side. The RIVER Pro can be charged via AC power, 12V car charger or solar panels.
Can RIVER Pro power my devices while it's charging?
Yes, RIVER Pro can output power while being charged.
The RIVER Pro is a versatile tool on many adventures, simple cleaning will likely be required from time to time. Use dry, non-abrasive cloths to wipe. If you need to clean more thoroughly, we recommend that you use detergent that is used for cleaning mobile phones and computer screens. DO NOT expose RIVER Pro to large amount of liquid.
Please store RIVER Pro in a dry and cool place. DO NOT place it near water. Please turn off the RIVER Pro and store it within its recommended use and storage temperature range. If you need to store the RIVER Pro for a long time, please discharge the RIVER Pro to 30%, then charge it to 85% every 3 months.
Please use RIVER Pro within its recommended operating temperature range. Using RIVER Pro out of the recommended operating temperature range may cause RIVER Pro to exceed its safe and effective working limits. RIVER Pro is not waterproof. DO NOT immerse RIVER Pro in water. Doing so will void the warranty. If RIVER Pro power electrical devices with heating elements (600W) for over a half hour, it is normal to see the high-temperature protection icon. Please wait for about 1 hour before charging the River Pro, or using it to power devices again.
The firmware can be upgraded using the EcoFlow App. Turn on the RIVER Pro before firmware upgrade. It is recommended that the RIVER Pro is connected to an AC power source or has about 50% battery level when upgrading. Please do not use RIVER Pro to recharge your appliances and devices during firmware upgrade. For more details, please refer to "How to upgrade firmware" FAQ in the EcoFlow App.

EcoFlow™ is a trademark of Shenzhen EcoFlow Technology Limited (abbreviated as "EcoFlow") and its affiliated companies

Here you can download full pdf version of manual, it may contain additional safety instructions, warranty information, FCC rules, etc.