How to Record Your Screen in OBS Studio

OBS Studio is one of the most powerful recording software right now. Whether you’re looking to record screen gameplay for your YouTube videos or just clips to show your friends, OBS is an effective free option. In this article, we will cover how to record in OBS, and how much storage space you need for your recordings.
- Guide to OBS Screen Recorder
- How to Record Gameplay Using OBS Studio
- Best Settings for OBS Screen Recordings
- Space Required for OBS Recordings
- Frequently Asked Questions
Guide to OBS Screen Recorder
Here are the steps you need to take in order to record or screen capture your computer screen on OBS:
- Step 1 First,downloadand install OBS. Then, choose whether you are on Windows, MacOS, or Linux.
- Step 2
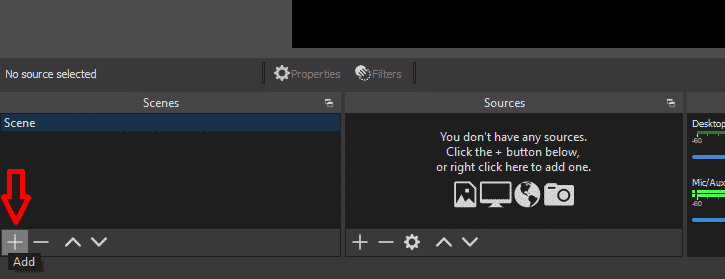 Add scenes. Open OBS and click on the “+” sign below “scenes” on the bottom left of the screen. Add a “recording” scene.
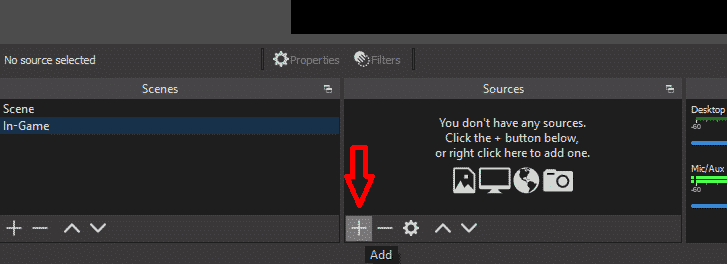
- Step 3 Add sources. Then, in the “recording” scene, click on the “+” sign below “sources” on the bottom left of the screen, and add a “display capture”. Select which monitor you would like to screen capture if you have more than one.
 If you choose to, you can add a “video capture device” to capture your webcam, and an “audio input capture” to capture your microphone audio.
- Step 4
How to Record Gameplay Using OBS Studio
Here are the steps you need to take in order to record your gameplay screen with OBS:
- Step 1 Repeat steps 1 and 2 in the “How to Record Your Screen in OBS” section.
- Step 2 Add sources. Then, in the “recording” scene, click on the “+” sign below “sources” on the bottom left of the screen, and add your sources. a. For gameplay, add a “game capture” source and select the game you would like to capture in the drop-down menu. By selecting “game capture” instead of “display capture,” you will be putting less strain on your computer. b. If you choose to, you can add a “video capture device” to capture your webcam and an “audio input capture” for the audio output capture of your microphone.
- Step 3 Repeat steps 4 and 5 in the “How to Record Your Screen in OBS” section.
Best Settings for OBS Screen Recordings
Let’s review the best settings for OBS screen recording in order to optimize the quality of your video output. It is important to note that these settings are only a rule of thumb since everyone has different setups.
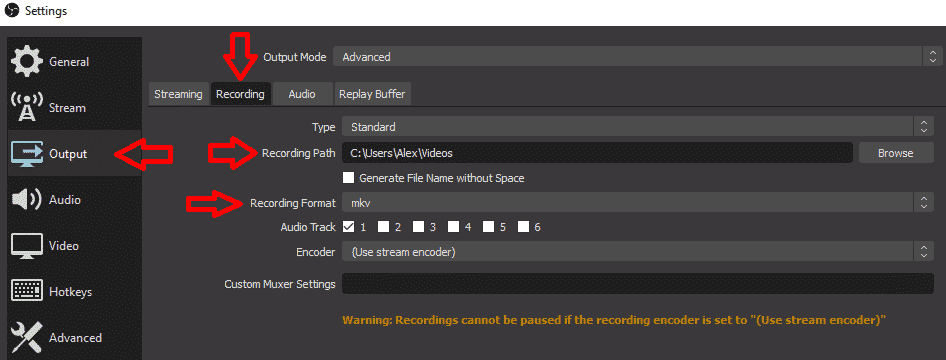
Firstly, in your settings, click on “output” and then the “recording” tab. Change your encoder settings to NVIDIA NVENC H.264 (new) if you have a 10-series or 20-series NVidia graphics card. This will ensure you get a much smoother recording since it will use your graphics card to encode the video, as opposed to your CPU.

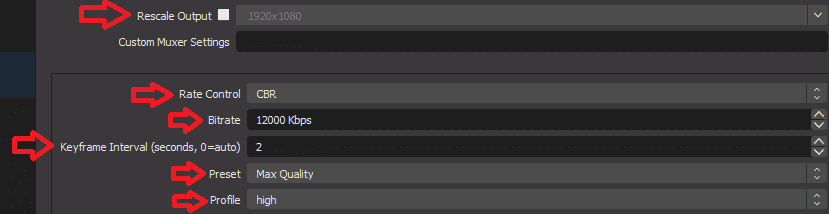
Secondly, make sure that the “rescale output” is unchecked and is at 1920×1080 if that’s your monitor’s native resolution. However, if you want to record in 720p, or if you have a 2k or 4k monitor, check the “rescale output” box and lower the resolution to that of your liking. Here are some other settings you should have:
- Rate Control: CBR
- Bitrate: 12,000 (if you’re recording at 1920×1080)
- Keyframe interval: 2
- Preset: Max quality (if your graphics card is a 20-series or newer)
- Profile: High profile
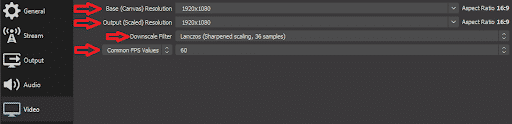
Lastly, in your settings, click on the “video” tab and enter these settings:
- Base (Canvas) Resolution: Native resolution of your monitor
- Output (Scaled Resolution: Same as the “rescale output” in the “output” tab
- Downscale Filter: Lanczos (if you’re downscaling the output)
- Common FPS Values: 60 (for a much smoother viewing experience)
Space Required for OBS Recordings
There are several factors that need to be taken into consideration when determining the space required per hour of recordings, such as the bitrate, frames per second, and resolution of your video. The higher each of these variables is, the more storage space that will be required.
Since most people will use recordings to make YouTube content, I decided to look at the recommended settings for 1080p and 720p YouTube videos and recorded one hour of FIFA 21 footage for each.
- For the 1080p and 60 FPS recording, I used a bitrate of 12,000, as recommended by YouTube. This yielded a file size of 5.1 GB for 60 minutes of gameplay. In 2022, 1080p and 60 FPS are standard and should be what content creators aim for. However, some people do not have fancy setups or enough storage space on their hard drives.
- As for the 720p and 60 FPS recording, I used YouTube’s recommended bitrate of 7,500. The file size for 60 minutes of gameplay was 3.2 GB. Therefore, by lowering the settings, you can save almost 2 GB for every hour of gameplay footage.
Frequently Asked Questions
Why Does OBS Record in FLV?
OBS automatically records in FLV by default. Of all the video file formats, FLV is least likely to crash when recording with OBS. And in the rare occasion that the FLV recording does crash, the file is less likely to be corrupt afterward. In addition, FLV is the ideal format if you are only capturing audio. While it is more challenging to post-edit FLV files, it is easy to convert them into edit-friendly formats.
Can You Make an OBS Record in HD?
You can change your settings to allow OBS to record in HD. Open the settings menu on OBS, then look for the “Output” section. You’ll find the “video bitrate” setting. From here, you have to choose the HD setting or 1920x1080p. Also, change the frame rate to 60fps since you are now recording in HD. It’s also best to change your recording path to a drive with substantial memory for saving your HD content.
Can You Make an OBS Record in MP4?
You can make an OBS record in MP4 by changing the settings. Go to the OBS settings menu. Under the Output section, look for “recording format” and choose the MP4 format. Confirm to apply these changes for your next screen recording.
Conclusion
OBS is a great screen recording software that will give any content creator great flexibility when it’s used to record your computer screen or gameplay footage. It’s generally better to record in the highest possible quality that you can, depending on the power of your computer and the storage space available. If you don’t have the space, you can lower the settings to your liking. Ultimately, choosing the proper settings for you is a balancing act.
